
The main goal of this article is to help you improve your English level. I will use Simple English to introduce to you the concepts related to software development. In terms of IT knowledge, it might have been explained better and more clearly on the internet, but remember that the main target of this article is still to LEARN ENGLISH.
Hi, I'm Tuan, a Full-stack Web Developer from Tokyo 😊. Follow my blog to not miss out on useful and interesting articles in the future.
When I need user authentication/registration in an app I'm making, I usually don't make it myself and instead use a SaaS service specifically for this purpose, called IDaaS. Specifically, I often use Auth0 or AppID (because they have a lot of documentation). These services not only provide user authentication, but also have online sign-up, password reset, and password-forgotten reset functions already securely built-in, so it's convenient for me to use without having to think about implementation.
In short, if you are using Auth0, you can easily implement a logic where authentication is done using OAuth on auth0.com, and if the authentication information is correct, you can get an access token using the information received in the callback.
If you use Auth0 to create an app, the username (display name) and its icon image will be determined at the time of registration (based on certain rules). Although the username is one thing, in particular, many people feel that they want to use an icon image that they like, not one that is automatically generated. However, the user cannot change it directly at present. Since it will be necessary to continue using the one determined at the time of registration, I felt that it was a problem that it was not possible to change the username and user icon with particular care.
After researching Auth0, I found out that an API for making changes is provided. In other words, there is no feature for users to make changes directly, but there is a way to create that feature within your own app. This blog entry is about trying this out with Node.js right away.
Change Profile Picture API
For example, the API for changing a profile picture is provided like this (the below figure is a sample in Node.js):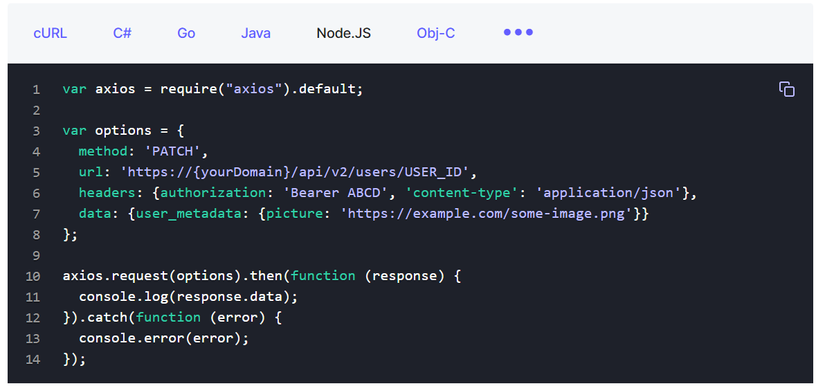
In the diagram above, specify the ID (User.id on Auth0) of the user who wants to change the image in the USER_ID part, and specify the image URL after the change as the value of the picture, and then execute the above REST API.
For Node.js, there is an SDK that makes it easier to do the same process, and if you use it, you just need to pass the necessary parameters to the update method of the ManagementClient class to execute it.
Both examples are presented as changing only the user's icon picture, but in reality it is possible to change many other attributes such as nickname, firstName, lastName, etc. in addition to the picture. Since the implementation itself is simpler for the latter (SDK), we will continue the explanation using this.
Prepare a client_id and client_secret
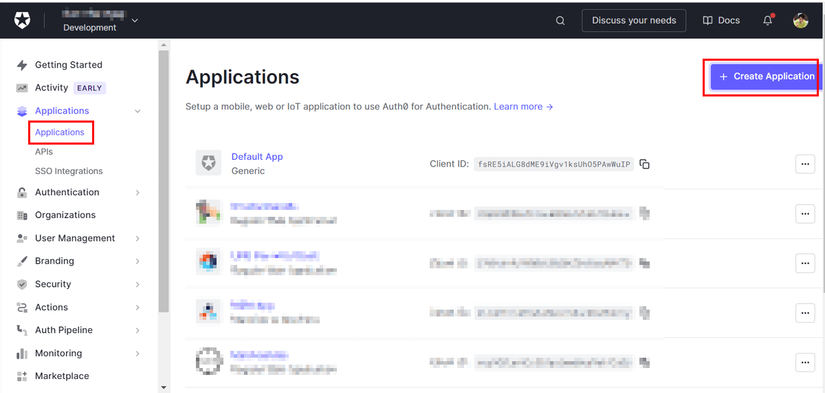
You need the same client_id, client_secret, and domain information as when you create an Auth0 authentication app to run this API. However, you need to be aware that you may need to get them again in many cases. The following is the screen when you log in to Auth0.com, select Applications - Applications from the menu, and then run "Create Application":
If you are adding authentication to your app using Auth0, it is likely that you will need to register an application with Auth0, choosing one of the following types depending on your app: "Native" (for mobile native apps), "Single Page Web Application" (SPAs), or "Regular Web Applications" (other web apps).
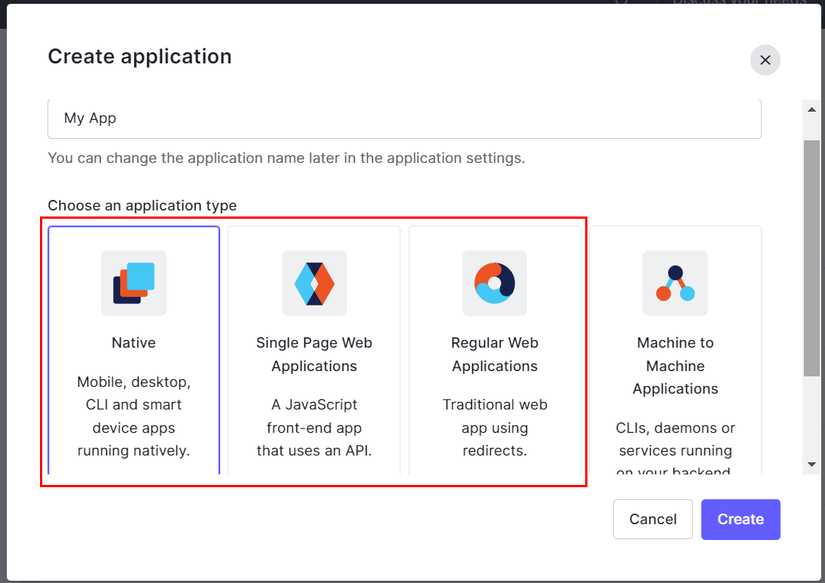
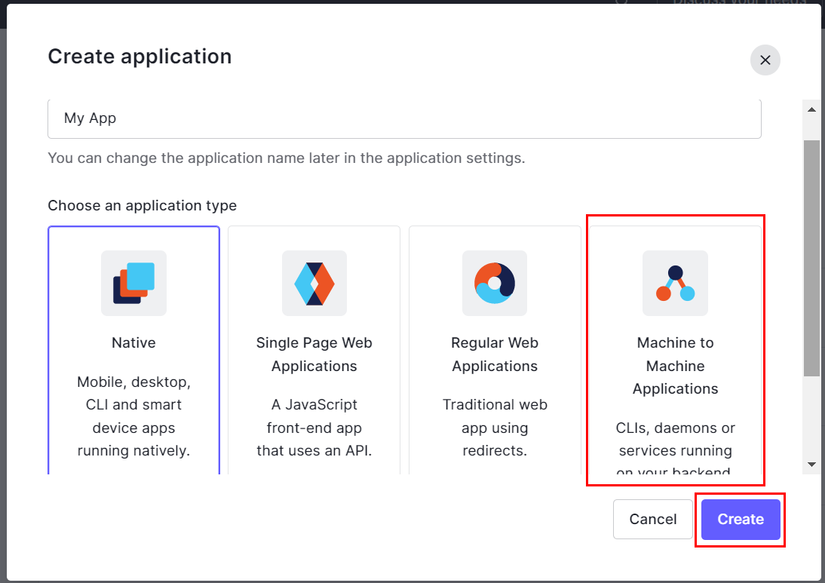
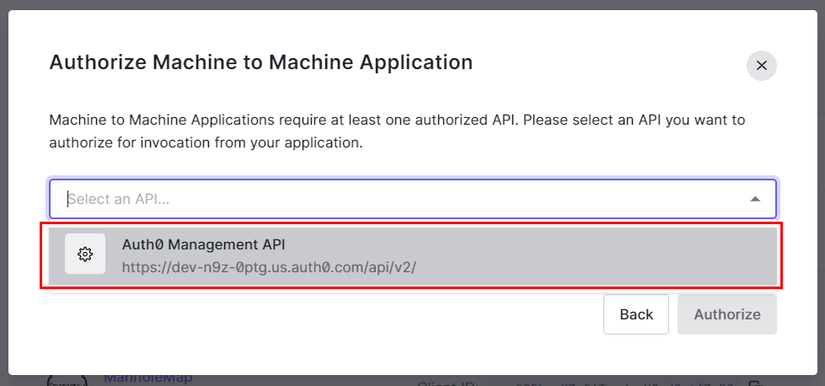
However, in order to realize this feature, you will need a "M2M (Machine to Machine) Applications" client_id and client_secret. Therefore, if you have not yet created an M2M app, please select Machine to Machine Applications and add a new one.
On the next screen, select the target API, but for M2M apps there is only one option, so select "Auth Management API":
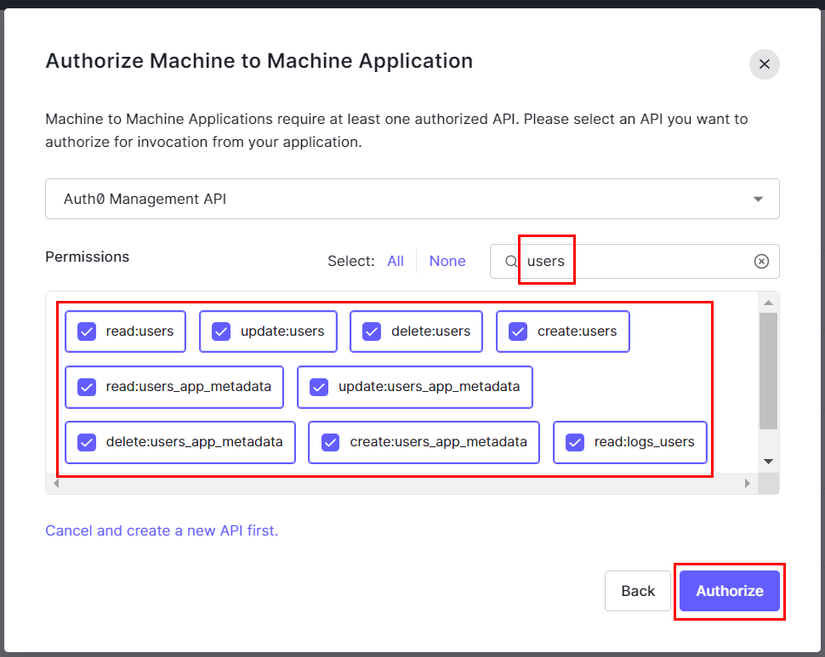
Finally, specify the permission scopes for the API. Since we are implementing user management, type "users" in the search bar, check all the scopes that appear, and click the "Authorize" button to complete the application registration.
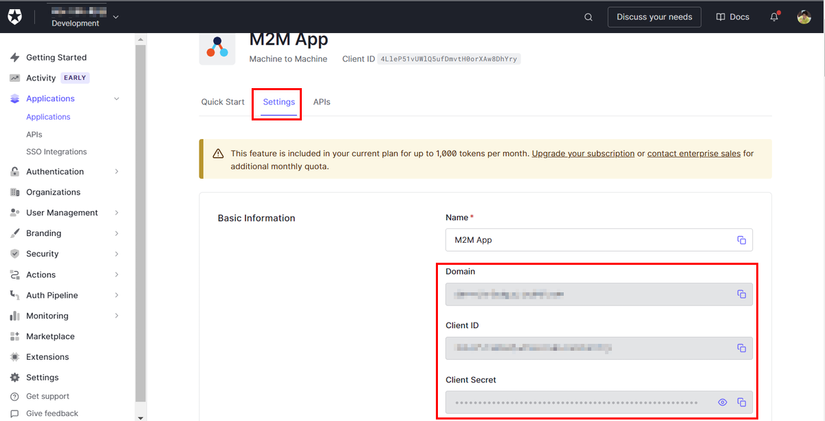
You will need the Client ID, Client Secret (and Domain, which should be the same as the one you got when registering the other app) of the M2M application you created (added) on Auth0.com. Please prepare it so that you can get it immediately when using it, such as copy and paste:
Implementation
Once you have finished the preparations, let's try implementing it. For Node.js, there is a convenient client library SDK called auth0, so let's use that to implement it. Lastly, I will include a link to the sample app source, so if you are interested, please download it and try it out.
First, we will instantiate Auth0:
//. Auth0 Management API
var ManagementClient = require( 'auth0' ).ManagementClient;
var auth0 = new ManagementClient({
  domain: 'xxxx.auth0.com',       // domain value
  clientId: 'client_id',          // client_id value
  clientSecret: 'client_secret',  // client_secret value
  scope: 'create:users read:users update:users'
});
Get the Auth0 ManagementClient, and instantiate it with the domain, client_id, client_secret values and the scope 'create:users read:users update:users' (all of these are necessary as scopes for updating the profile picture URL). To reiterate, the important point here is that the client_id and client_secret specified here must be from the application registered as an M2M application, not from a regular native/web application.
If we want to change the profile picture URL for the user with user_id = 'abcabc', we would do the following process:
var params = { user_id: 'abcabc' };  // User with the user ID 'abcabc' are the target.
var metadata = { picture: 'https://manholemap.juge.me/imgs/logo.jpg' };  // Change the profile picture to the one at the specified URL.
auth0.users.update( params, metadata, function( err, user ){
  if( err ){
    console.log( { err } );
        :  // When there is an error, handling it.
  }else{
    console.log( { user } );
        :  // Successful processing.
  }
});
We will use the auth0.users.update() function to execute, specifying the target user's information as the first parameter and the changes as the second parameter. We will then identify if there was an error or success and continue processing.
In the example above, we are only changing the profile picture, but it is also possible to change multiple attributes at the same time. For example, the following example changes the profile picture (picture) and display name (nickname) of the target user at the same time:
var params = { user_id: 'abcabc' };
var metadata = { nickname: '俺', picture: 'https://manholemap.juge.me/imgs/logo.jpg' };
auth0.users.update( params, metadata, function( err, user ){
  if( err ){
    console.log( { err } );
        :
  }else{
    console.log( { user } );
        :
  }
});
I have provided a sample app that actually works as a reference: https://github.com/dotnsf/auth0-userpicture
If you want to actually run the sample app, you need to register a regular web application (not M2M) with Auth0 and get its client_id, client_secret, and domain. You also need to register the OAuth callback URL (callback_url) in the environment variables at runtime. You can also substitute this by writing the contents in the .env file in the same repository at runtime.
If you refer to it, you will understand that you need the user ID of the target user to actually change the user's attributes. The user ID can be obtained after logging in with OAuth, so you need to register two applications, a normal (regular web) application and a M2M application for user management, and implement it using both the client_id and client_secret. Please refer to the source code for more details.
And Finally
As always, I hope you enjoyed this article and learned something new. Thank you and see you in the next articles!
If you liked this article, please give me a like and subscribe to support me. Thank you. 😊
The main goal of this article is to help you improve your English level. I will use Simple English to introduce to you the concepts related to software development. In terms of IT knowledge, it might have been explained better and more clearly on the internet, but remember that the main target of this article is still to LEARN ENGLISH.